

When I mentioned pikelets in my post last week, I was surprised at how many questions I got about them – what are they are how do you make them?
The comments I got on my Ham and Cheese Scone recipe last week really surprised me. Some people said they had never tried scones, and lots of people asked me what pikelets are.
For me, it’s so funny to think of a life without pikelets. Just like the scones, they were such a stable in our household when I was growing up. With 6 mouths to feed, my Mum made good use of quick and easy recipes that were really cost effective. Once again, pikelets, like scones, feed a good number of hungry mouths in a short amount of time.
My parents’ house was always welcoming to anyone. You never visited without being offered a cup of tea and a treat of some description, whether it was a biscuit (cookie) or a scone or pikelet. If you were there at mealtimes, you got fed, that’s all there was to it.
I was the youngest of four children and during my younger years, my brothers’ friends were always frequent visitors – they came in hoards! It was not unusual to wakeup in the morning to find 20 extra people asleep on the lounge floor.
You can imagine why, with all these hungry mouths to feed, my Mum resorted to such quick, easy and cheap recipes. Pikelets are basically tiny pancakes.They are made slightly differently but they are even easier.

They are also extremely versatile – they can be eaten hot, right from the pan (burning your fingers), they can be eaten cold, with a multitude of toppings, they can be savoury or sweet, they can be frozen for school lunches for those unexpected visitors.
It literally takes about 10 minutes to whip up a batch of pikelets.
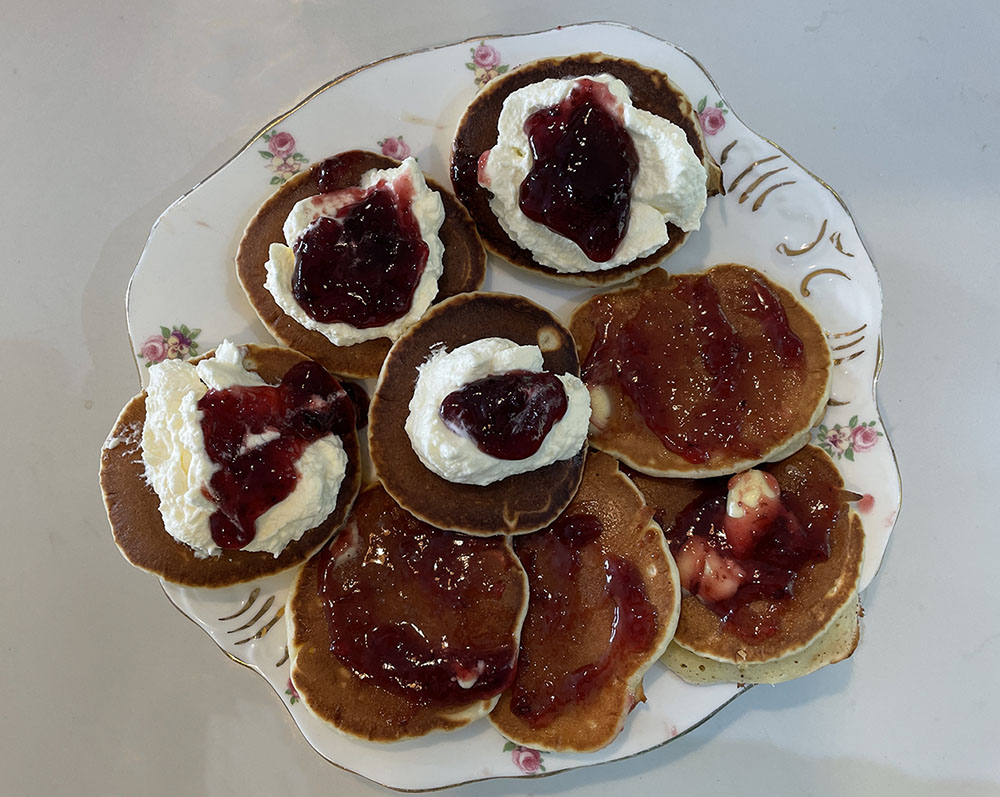
The best decision you have to make when serving and eating pikelets is what to put on the top of them. There are so many choices, savoury or sweet. Here’s just a few examples:
You can go wild! Pretty much anything you can put on a slice of bread, you can put on a pikelet.
The best thing is that you don’t even need to think about it. If you’re serving these pikelets to a group, then simply put out some topping ingredients and let them go for it. You’ll be amazed at the combinations that are created.
This is the recipe that my Mum always used – recipes handed down from generation to generation are always the best.

Whisk the sugar and egg together until it is nice and thick.
Sift the dry ingredients.

Add the milk and sugar/egg mixture to the dry ingredients and mix well until there are no lumps. You don’t want to overwork it here, only as much as you need to get the lumps out.

The consistency should pour easily off the whisk when you lift it up. If it’s not this consistency add a little more milk – a tablespoon at a time.

Add the melted butter and whisk again.

Heat the pan to medium, hot. Just like with pancakes, as you cook the first batch, you may need to adjust the pan temperature.
While you should grease the pan just a tad, it’s important not to add too much butter – if you do the pikelets will fry, rather than cooking nice and evenly. The pan needs to be hot enough to cook the pikelets quickly but not too hot that the surface burns before the pikelet is cooked all the way through. As each stove and pan is different, you’ll need to experiment a bit with this but once you have it down, you’ll never look back.
Take a dessertspoon of batter and drop into the heated pan.

Let the pikelets cook, untouched until the bubbles start to pop. When they look like the picture below, it’s time to turn them. (Tip: this is the same for pancakes.)

Using a flat spatula, flip the pancakes over.

They should be golden brown. If they are not, then wait until the second side is cooked and just flip them again until they are brown. The second side should only take a couple of minutes – the pikelets are done when you can press on them with a finger, and they bounce back. You’ll only need to test the first one, then you’ll be able to judge. If you are unsure, just flip again them to see if they are done.
Honestly, if it’s like my house, you’ll be batting the snatching hands away long before you can get these to the table. If you don’t have hungry hoards trying to steal them, then place the pikelets on a cooling rack covered with a tea towel. Fold the tea towel back over the pikelets to keep them warm. This also gives them a bit of a steam so they stay nice and soft.
In the unlikely event that you have any pikelets left, simply store the cooled pikelets in an airtight container. Don’t put them in the fridge unless they have toppings on that need to be refrigerated. They are best stored without toppings if possible.
To freeze pikelets, simply wrap them in cling film or put them in aplastic bag and pop them into the freezer. If you want them to be free flowing you can either put them on a tray lined with baking paper and into the freezer for about an hour before putting them into a bag or you can use this method.
Beat the egg and sugar together until thick.
Sift the flour, baking powder and salt together.
Pour the milk into the egg and sugar mixture, then add the dry ingredients.
Whisk until the ingredients are combined and there are no lumps. Don’t over mix or the pikelets will be tough.
When the mixture is lump free, whisk in the melted butter.
Cook the pikelets in dessertspoonfuls in a very lightly greased medium/hot pan.
Add your favourite toppings or eat as is.


Thanks so much for reading! Leave me a comment to let me know what you think. Did you make this recipe or do you want to?
If you like my blog be sure to click on the RECOMMENDED button and SHARE it with your friends! It’s the best way for my blog to grow. I would love for you to be part of my family so sign up to receive my emails. Every time I post a blog, I will send you an update email. Also, follow me on Facebook HERE, Instagram HERE and Pinterest HERE.
Come by and say Hey!
Tags:
May 20, 2021

Hi, my name is Carol Karl. I live in little old New Zealand. My family and I strive to live the most ‘real’ life we can – by that I mean that we eat real food, we live real lives and just generally be our most authentic selves.


