

Using jump rings is an integral part of making jewellery so today I thought I’d talk about what they are and when and how to use them.
Watch the video or read the instructions below.
Jump rings come in lots of sizes. You can see here I have jump rings starting at 4mm and going up to 16mm. They also come in various shapes but are most commonly either round or oval.
In the picture below, I also have some triangle shaped jump rings.

Jump rings are jewellery making essentials. They allow you to attach everything from chains to clasps and pendants to charms. Whether you’re making earrings, necklaces or bracelets, you will need to know how to use jump rings to create professionally finished pieces that are durable enough for everyday wear.

It’s important that you choose the right jump rings for your design. Obviously you’ll want to take into account finish and shape, but you’ll also need to consider diameter – which determines the size of the jump ring – and weight, which is the thickness (diameter) of the wire used to create the jump ring.
Together, these two measurements determine how strong the jump ring is. As a rough guide, the heavier the piece you’re creating, the stronger your jump rings will need to be.

There is a right way and a wrong way to open a jump ring. If you open the ring using the incorrect procedure, you will damage it and it won’t be the wonderful round shape that it was. Opening them incorrectly can weaken them and cause them to snap, leaving you with a fragile or even broken piece of jewellery.
The correct way to open a jump ring is to use two pairs of chain nose pliers. The inside of the jaws of chain nose pliers is nice and smooth so it won’t damage your wire.
Hold the jump ring on each side with a pair of pliers with the split at the top as shown below.

Turn one hand away from you whilst holding the other hand stable. This opens the jump ring. Now you can feed on whatever it is you would like, be it a charm, dangle or clasp.

Closing the jump ring can be slightly more troublesome than opening it but it’s still not difficult.
Hold the jump ring in the chain nose pliers as you did to open it with one set on either side of the ring.
Now holding one hand steady, twist the other hand to close the ring. You should feel the metal of one side of the ring scrape against the other piece.
Sometimes when you close the jump ring it either has a gap or it crosses over. Let’s look at how to fix that:
You’ve closed your jump ring but there’s still a gap and it’s not quite closed. Take the jump ring in the jaws of your pliers just as you did before. Holding one hand steady, move the other hand up and down slightly while giving a little pressure towards the other hand. Keep wiggling up and down until you feel the connection between the two pieces of wire.

If a jump ring is crossed over this means that the two ends of the ring are too close together. To remedy the problem, hold the jump ring in the jaws of your pliers as before, then, holding one hand steady, move your opposite hand up and down slightly while very carefully pulling gently away from the other hand. You should feel the metal pop into place.
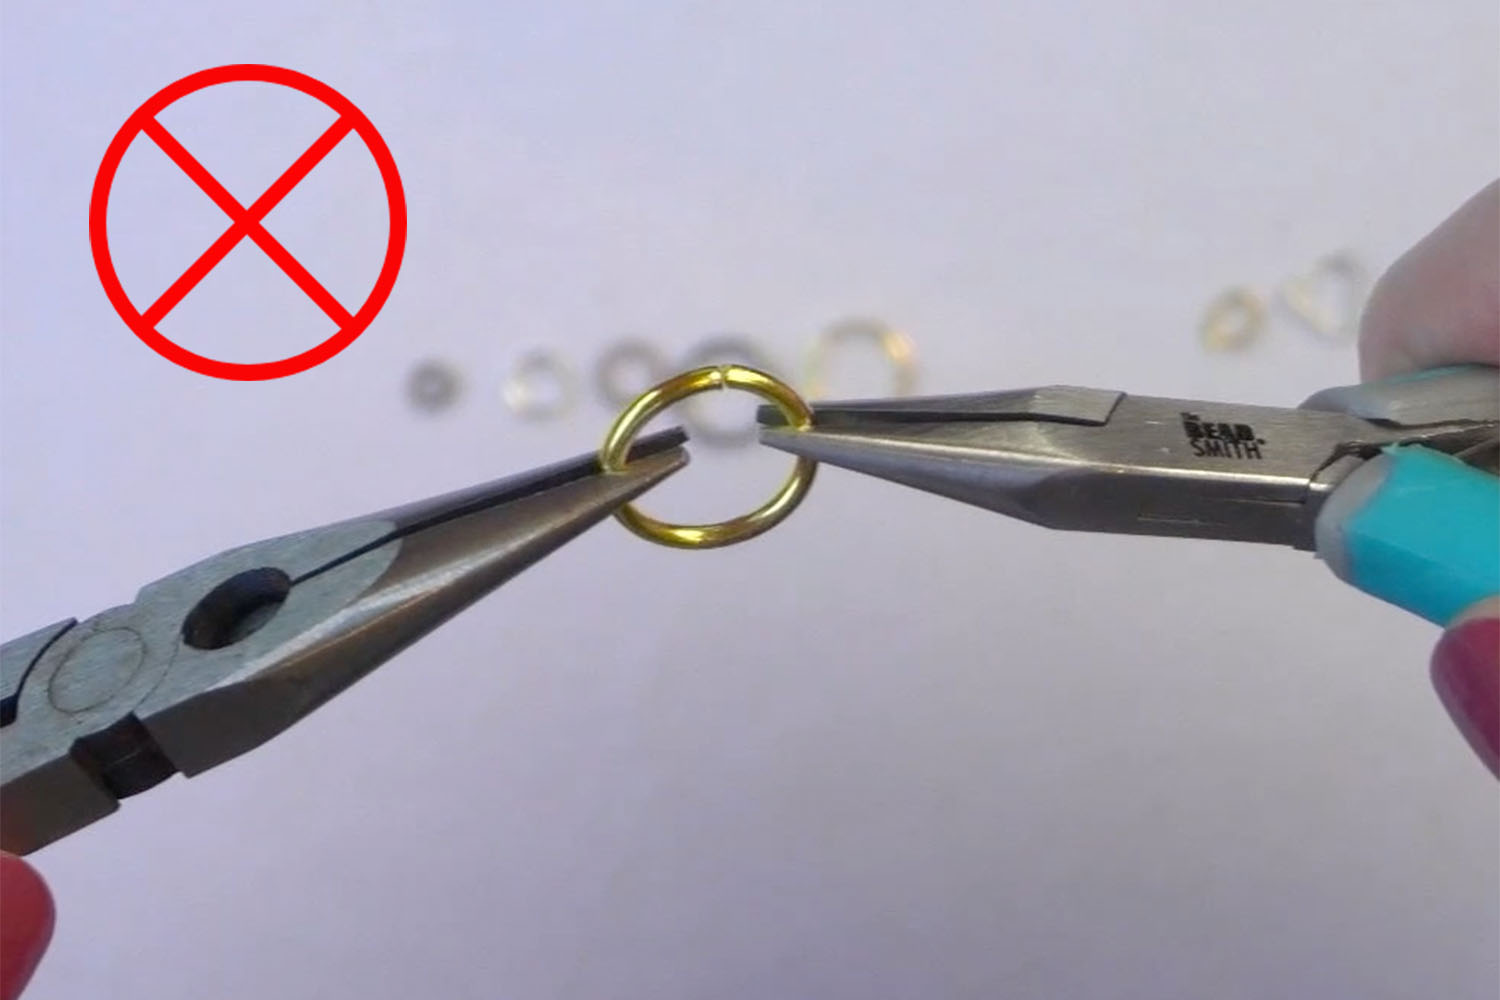
There are a couple of absolutely no-no’s when it comes to using jump rings.
Never pull the jump ring apart from side to side – always open using the up and down motion mentioned above.

Always support your jump ring by holding each side in the jaws of the pliers, not with the tip. If you do this there is a risk that you will bend the jump ring. Remember your jump ring needs your support!
I hope that you found this explanation about jump rings useful and feel more comfortable about using them now. Jump rings are one of the most common supplies you will use in your jewellery making and they are super easy to use once you learn how. Practice with a few, opening and closing them and you’ll be a pro in no time.
PIN FOR INSPIRATION AND SHARE WITH YOUR FRIENDS!!

If you like my blog be sure to click on the RECOMMENDED button and SHARE it with your friends! It’s the best way for my blog to grow. I would love for you to be part of my family so sign up to receive my emails. Every time I post a blog, I will send you an update email.Also, follow me on Facebook HERE, Instagram HERE and Pinterest HERE.
Come by and say Hey!
Tags:
August 3, 2021

Hi, my name is Carol Karl. I live in little old New Zealand. My family and I strive to live the most ‘real’ life we can – by that I mean that we eat real food, we live real lives and just generally be our most authentic selves.


